Snowman Store

Hi friends!  I wanted to stop in and share this great activity we did this week in math. We had so much fun with this and there were SO MANY great math skills being practiced all at once.

It all started with a picture.

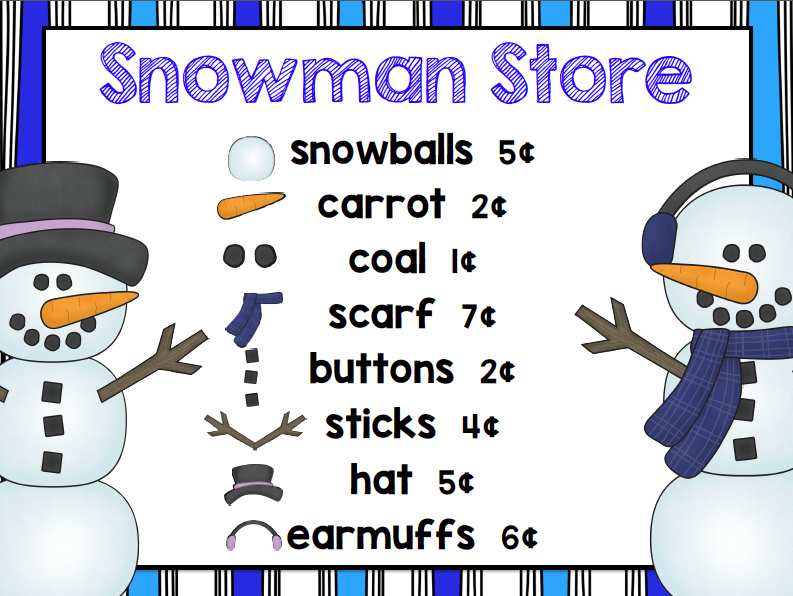
Last week I saw this post on Instagram and immediately my head started buzzing with ideas. A snowman store where the kids buy all the pieces that they need to build a snowman?? LOVE.IT.  We have been working with money the last few weeks and I decided that this would be a great way to make it meaningful for my kids.

My teaching assistant donated a TON of real coins to the classroom a few years ago so the kids get to learn with real money which they absolutely love!


To prep the stores I just cut up some carrot noses, hats, earmuffs, scarves, sticks and a bunch of buttons and coal.  I also used die-cut circles for the snowballs.


Over the last few years I have been acquiring these circle punches in various sizes. They work perfectly for eyes, and various other craft pieces. These were perfect for the coal, buttons and earmuffs.


There are a ton of different ways you can set this up but this is what worked for my class:

I projected the price list up on the starboard. 


I split my class into 2 groups - buyers and sellers. We have 6 tables in our room so I had 3 tables of buyers and 3 tables of sellers. I had each buyer table go to a specific seller table so everyone always had a task.

The buyers had to buy 1 piece at a time for their snowman. They chose the piece to buy, checked the board to see how much that piece cost, and gathered the correct amount of money. 


 I wanted the sellers to get some practice with making change so I made the rule that the buyers could NOT use pennies to buy. This rule also made the buyers had to really think about coin values so for example if they wanted to buy a scarf for 7 cents they had to pay with 10 cents and the seller had to give them 3 cents back. 

Each time the buyers bought a piece, they took it back to their desk and recorded how much that item cost them. This was opportunity for some more great math skills as many of the times were bought in multiples so for example, they had to figure out how much 4 buttons cost at 2 cents per button.  


I just loved hearing all of the math talk going on while they were buying and making change for each other. When 1 group had finished buying all the pieces for their snowmen I had all the buyers put their pieces into a plastic bag to store while we switched up. Then all the buyers became sellers and the sellers became buyers. When we finished the second round everyone got to glue their snowmen together.

Quick tip: you will have to keep going around and transferring pennies from the buyer bucket back to the seller bucket so that each "store" has enough pennies to make change.

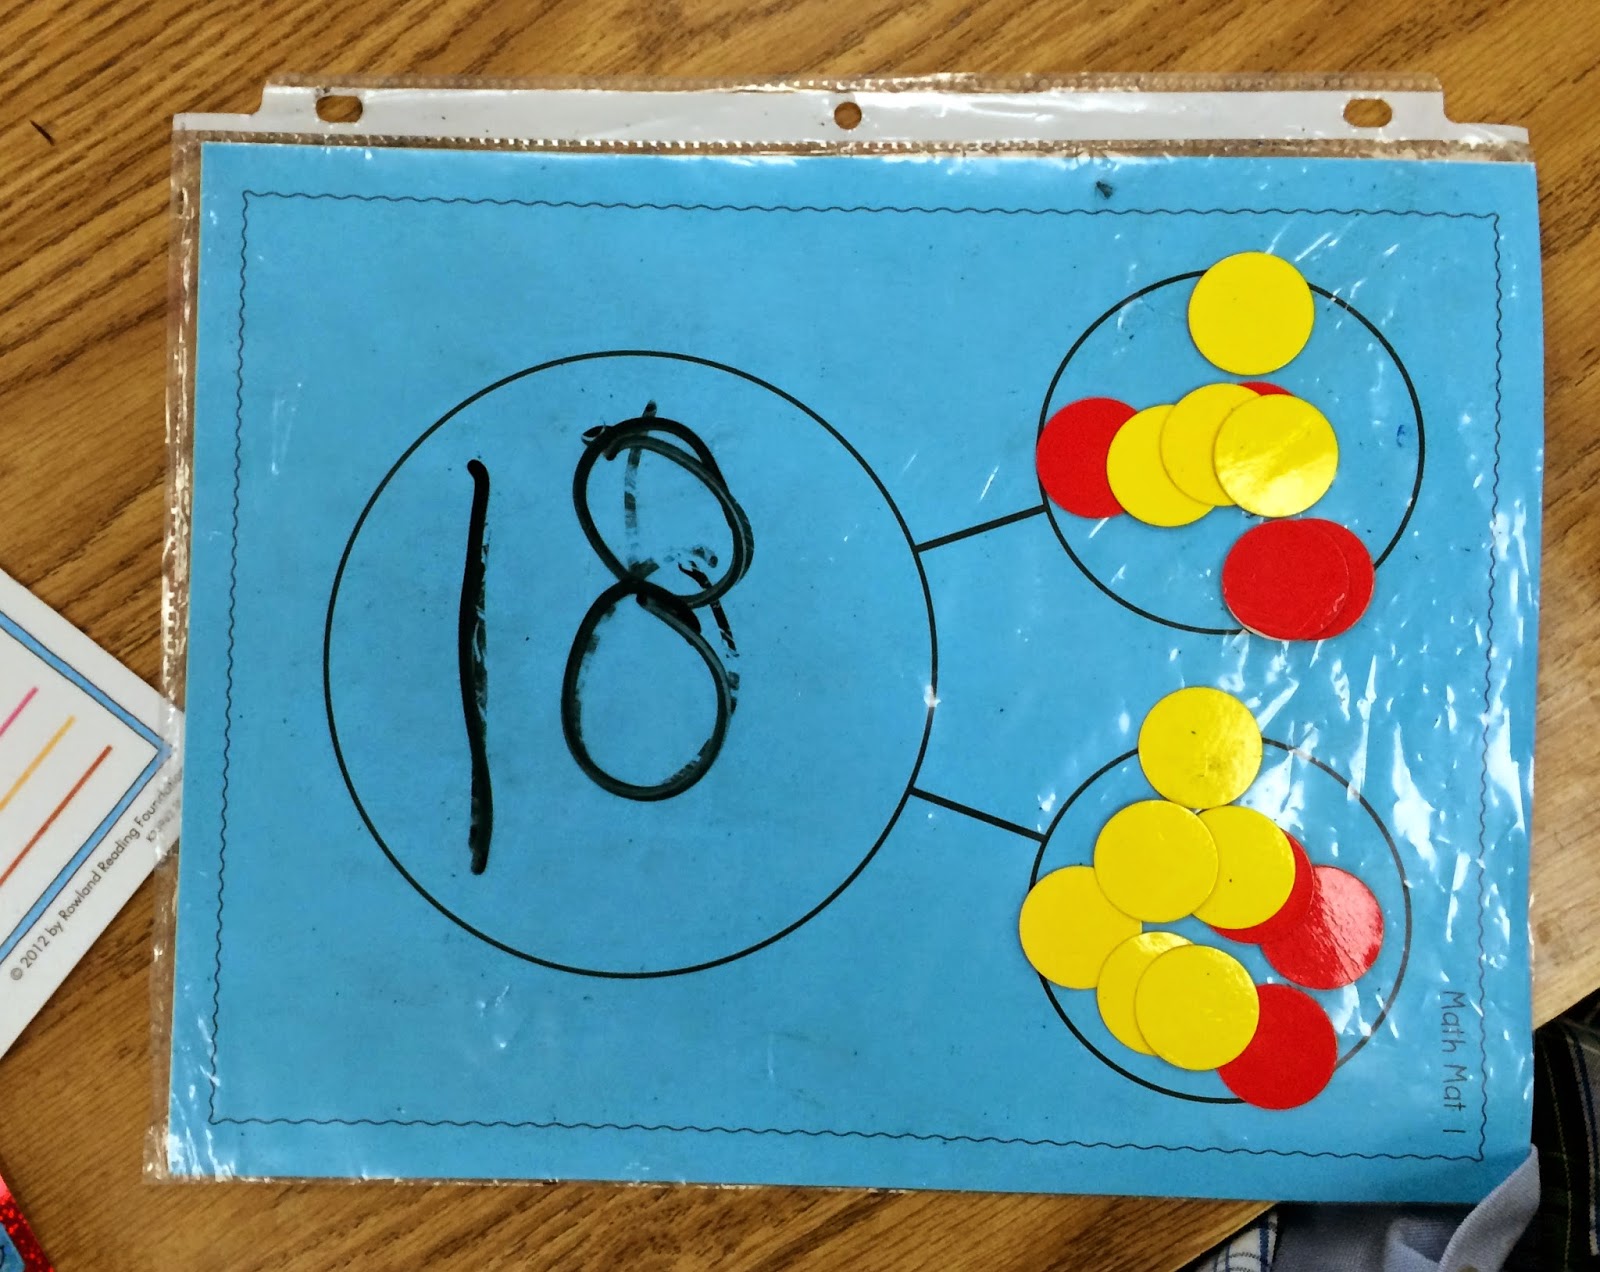
The next day, we went back and counted up how much money they spent in all.  I gave everyone back their snowman, a recording sheet, and a coin mat. (Please excuse the terrible lighting on this phone pic!)


First they put the correct amount of money in the box for each item bought Then it was time to count. My kids are doing really great at this point at counting up large numbers of mixed coins so I decided to add a bit more of a challenge. We watched the Brainpop Jr lesson on equivalent coins and I told them I wanted them to get their money down to the smallest number of coins that they could before counting up their spending total.  After they had filled their mat with the cost of each item, they started trading in coins for larger coins. When they couldn't trade in anymore, they counted up their spending total and recorded it.

Finally I had them compare spending totals with a friend and discuss why their totals were different. Again, there was some really great math talk going on as they discussed why their totals were different and compared what they spent their money on. 

I absolutely loved this activity. I'll admit, it was loud and a seemingly chaotic but everyone was really engaged and practicing a ton of math skills in the process.

You can find the price list and recording sheets by clicking the picture below.


https://drive.google.com/file/d/0B81lWh5DUH8AQkpPYnhWR1dUbW8/view?usp=sharing

Have a great weekend yall!!

Combination snowflakes!!

My sweet kiddos this year are always surprising me with things that they do. One morning this week one of my boys brought me a white board with an idea that he had for a math activity that we could do. This is what he showed me:


He said "We can all pick a number and write all the different combinations on the points of the snowflakes! And then we can hang them up around the room!!" I thought it was a great idea and we made them that afternoon!

When you are making snowflakes and you fold the paper enough to make it look like a pizza pie it's not hard to know where to hold and where to cut, but I wanted these ones to have a specific shape and number of points so I had them fold the paper into quarters.   I gave everyone a sticker on one corner of their folded paper and put a sticker on the same corner of the tracer. This way everyone knew exactly where to place the tracer on the paper so we all got actual snowflakes and not random cut apart pieces of paper.


After everyone cut out their snowflakes I had them pick a teen number to use. We are getting really good with our facts to 10 and are working on facts to 20.  Some students needed some extra support with the use of some counters and a number bond in order to make the 4 different combinations.


When they had come up with their 4 combinations on a white board I let them place them on their snowflakes.  They matched the marker colors and placed the numbers for each combination on opposite points of the snowflakes.

By some horrible mistake I found myself VERY low on white construction paper (in the middle of January!) so we had a lot of blue snowflakes ha!  After they had written all of their number combinations, we folded the snowflakes back up (with the number side out) and cut holes in the middle to add some more interest.


This was such a fun and easy way to practice some math facts and I just loved the fact that it was a student's idea!!


You can grab the template for the tracer here.

We are diving head first into some penguin research this week. I hope yall have a great week!!

Hot Chocolate Math Freebie!

Happy Sunday friends!!

I just wanted to share a game we played in math centers this week that was a huge hit. We are still working on becoming fluent with those math facts so I made this quick little game for them. This was a good mix of skills because it encouraged quick recall of facts, decomposing and some missing addend practice all in one game.


This can be played in pairs or groups of 3 (I have an odd number of students this year). Each student gets a board, a spinner, and a set of hot chocolate cards.

When everyone has placed their cards, they yell go and start to race each other to fill their boards with "marshmallow numbers".  The hot chocolate cards are the whole in the number sentences and the marshmallow numbers are the parts. They spin a number and decide where they can put the number on their board. If they spin a number that they can't use, they just spin again. There are also a few wild spots that they can use as any number.  (You can see that this student really loved using 0 as the wild number - I gently guided him to start trying some other combinations)


The first person to fill their board yells "hot chocolate!"  Everyone checks to make sure their math is correct and then they all erase, pick new numbers and play again. Easy fun + great math practice = my favorite kind of math center.

I made boards for both math facts and combinations to 10 (depending on what your kids need to practice)


You can grab the game for free in my store by clicking the picture below.

http://www.teacherspayteachers.com/Product/Fill-Your-Mug-Addition-Math-Fact-Game-1656642


Enjoy your extra day off tomorrow!!


Binder covers to dry erase boards

I'm excited to share another Bright Idea along with some fabulous teachers!!


This is one of my favorite tricks from my early years of teaching.  I've been fairly limited on copy counts and laminating in the last few years so I really try to limit the copies that I use for centers.  I generally have a lot of games and recording sheets in sheet protectors. A few years ago someone dumped a BUNCH of old binders in the teachers lounge and we hit the jackpot. Unfortunately the actual binder rings were busted but somehow we got the idea to cut off the covers and turn them into dry erase boards.

While I use a lot of sheet protectors as well, these binder covers are great because they are sturdy and keep the paper that you slide into them nice and neat (so many times when I pull papers or even card stock out of sheet protectors in a center they are all wrinkly from the wear and tear of little hands).


Just cut off the cover of a binder along the corner.


Papers slide easily in and out of these covers. I've added some washi tape to some of mine to add a little bit of pizazz.


Easy peasy right?? They work great for playdoh mats, spinners, game boards,  dry erase boards, or recording sheets for centers.


Be sure to scroll down to find lots of other great ideas from lots of great teachers! Happy Saturday friends!!